


So we all know and agree a battery watering system is a great time saver and takes the guess work out of watering your batteries. Whether you own a Duffy boat, golf cart, RV or Solar system it is all the same. Any multi-battery battery bank comprised of lead acid batteries will require watering and proper maintenance to ensure proper performance and long battery life.
How often?
The hassle comes from having to check and fill or top off each battery cell on a regular basis. All relative to use (charge/discharge) but on average a good rule of thumb it should be done monthly. Bi-monthly if it is a cart or system used daily. So you have purchased your new golf cart battery watering system and still not quite sure when or how to use it. Hopefully this little How To article will take all the guess work out of the procedure of actually filling your batteries with distilled water.
Important note
Most important element of this procedure: only check and fill batteries or the battery bank after they have been fully charged!
How To Use A Golf Cart Battery Watering System with Manual Hand Pump
Step 1
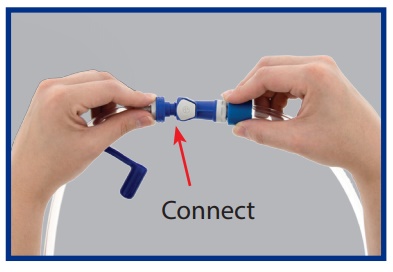
Connect the manual pump to the battery watering system by inserting the connector from the kit into the connecting adapter on the hand pump.
Step 2
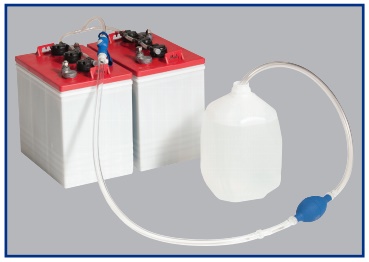
Place the opposite end of hand pump tubing into a gallon jug of distilled water.
Step 3
Squeeze the bulb on the manual pump to begin filling the battery cells with water. Not fast pulses but slow deliberate hand action especially in the initial priming of the pump. Squeeze completely and release to let the tubing and ball begin to fill with water. Usually takes several to do so. Then you will start filling the batteries. Watch as the quick look indicators start to rise and fall with every pump. When the bulb becomes very hard and the valve indicator eyes have risen, all of the cells should be full.
Additional Information
Water level confirmation is done by looking at the indicators on the individual valves of a BWT system or Philadelphia Scientific system. Flow-Rite systems installed on the Club Car golf carts unfortunately do not have one so one must base level on hardness of hand pump.
Hydro-Link battery watering system found on Ezgo golf carts have one in the center of the manifold over battery cells. As the water level inside the batteries increases, the battery cell valves are pushed upwards by the floats at the base of each cell valve to give you a visual indication that the correct electrolyte level has been achieved.
Step 4
Disconnect the hand pump via the connecting adapter from the watering system.
Step 5
Replace the dust cap on the battery side of the system to ensure no debris or dirt gets into the connection.

Special Notes
Remember – “ONLY WATER BATTERIES AFTER FULLY CHARGING! The electrolyte levels inside the battery rise during the charging cycle, and fall during the discharge cycle. Batteries need to be watered every 2-4 weeks depending on battery usage, operating temperatures and the age of the batteries.
How To Use A Golf Cart Battery Watering System Fill Tank
Using a gravity feed fill tank is a great way to get electrolyte into a battery bank. Especially good for large battery banks like solar applications and such where it would just take forever to use a manual hand pump. Most important element of this procedure: only check and fill batteries or battery bank after they have been fully charged!
Step 1
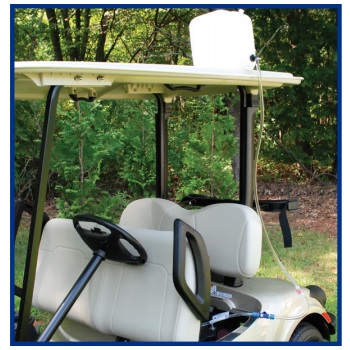
Place the gravity feed tank at least 3’ above the top of the batteries.
This will ensure sufficient water flow. (See Image Below)
Note
When in use, the gravity feed tank should be placed at least three feet above the batteries to ensure proper water delivery. Users often place the gravity tank on the roof of the golf car to ensure that there is plenty of height to allow the water to flow freely. The watering system should always be disconnected from the water delivery device after filling. It should never be left attached to the watering system.
Step 2
Connect the fill tank to the battery filling system
Step 3
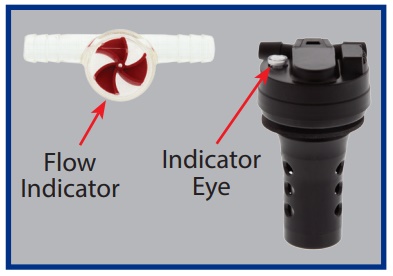
Insert the one point male connector on the battery watering system into the connecting adapter on the gravity feed fill tank. Once connected the flow indicator will start to move reflecting water/electrolyte is flowing into your batteries. When the flow indicator stops spinning the battery bank should be full. You can then confirm by looking at the quick look indicators on the individual valves of a BWT system or Philadelphia Scientific system.
Flow-Rite systems installed on the Club Car golf carts unfortunately do not have one. Or usually in the center of the manifold of a Hydro-Link battery watering system. As the water level inside the batteries increases the battery cell valves are pushed upwards by the floats at the base of each cell valve whereas the indicator eyes will reflect this action and come up on the valves to give you a visual indication that the correct electrolyte level has been achieved.
Note
Battery watering system gravity fill tanks are faster than using a manual hand pump but not as fast as a direct fill link. Direct fill links are usually used in industrial or solar applications where big big batteries are common – like a fork lift battery comprised of many large 2 volt cells.
Step 4
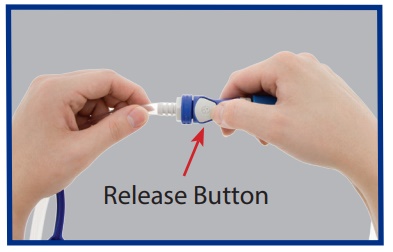
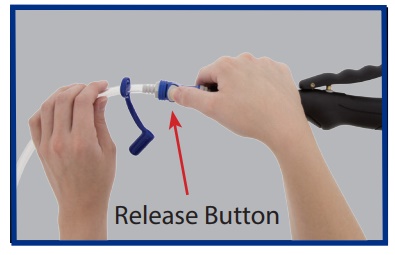
Disconnect from the battery watering system by pushing the release button on the connector.
Step 5
Replace the dust cap on the battery side of the system to ensure no debris or dirt gets into the connection.
How To Use A Golf Cart Battery Watering System with Direct Fill Link
Using a direct fill link to water your batteries is by far the fastest way to do so. Commonly found in industrial or solar applications where large batteries or large battery banks are common. Also used for golf course golf cart fleet maintenance.
Step 1
Be sure batteries are fully charged.
Special Note – Inlet pressure range is 10-90 PSI. Air should be purged from the hose line before filling. Simply run water through the hose before connecting the direct fill link to the hose end.
Step 2
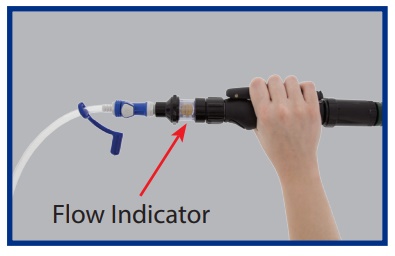
Connect the direct fill link to the battery filling system by inserting the male connector from the kit into the female connector on the link.

Step 3
Squeeze the handle to start the flow of water. The flow indicator will spin indicating that water is flowing through the valves into the cells.
Step 4
When the flow indicator stops spinning batteries should be full.
Note
Depending on the battery watering system in your application you may or may not have a indicator to confirm. Found either on the individual battery cell valves, or on a manifold that covers multiple cells. The indicator should come up on the valves giving a visual indication that the correct electrolyte level has been reached.
Step 5
Disconnect Direct Fill Link from the battery watering system by pushing the release button on the connector.
Step 6
Replace the dust cap on the battery side of the system to ensure no debris or dirt gets into the connection.
Special Note
Adhere to the following operating requirements when using the direct fill link: ALWAYS DISCONNECT FROM WATER SOURCE AFTER FILLING.
Help is on hand
Get in touch with Pete’s team for any more information on choosing the right Battery Watering System for your golf cart or other battery bank. Read more about Battery Watering Systems here.


5 thoughts on “How To Use A Golf Cart Battery Watering System Properly”
Thank you!!!! This is the best help I have found.
Great instruction.
You stated above ”You can then confirm by looking at the quick look indicators on the individual valves of a BWT system or Philadelphia Scientific system.”. What should the indicator eye look like when the battery cell is full?
You will see white in the sight glass when full and the white tip will be flush with top of glass… as the electrolyte level is dimenished that white tip will fall lower into the sight and back into battery cell.
Pete’s team
Air has displaced about 6 inches of water in the hose. If the air should be purged, how is that accomplished?
Should not effect the filling of the batteries… though you can simply purge from the system by starting to pump water in from your water jug and once the air bubble leaves the tube section crack one of the valves away from the battery it is going to to relieve the pressure and remove some of the air… but needs to be done under pressure…
Pete’s team
Comments are closed.