Getting your golf cart to zip around the course reliably relies heavily on how well you connect those batteries. It’s more than just red to positive and black to negative! Different golf carts use different voltage systems (like 36V or 48V) and battery types (traditional lead-acid or modern lithium-ion).
In this comprehensive guide, we’ll walk you through everything you need to know to connect your golf cart batteries like a pro. Whether you’re a seasoned DIYer or a complete beginner, we’ll provide clear instructions, helpful diagrams, and expert tips to get you powered up and back on the green in no time.
Let’s get started!
Table of Contents
Tools and Safety Precautions
Before you start connecting your golf cart batteries, it’s important to gather the right tools and take the necessary safety precautions. Here’s what you’ll need:
Tools:
- Wrench or socket wrench: This will be used to loosen and tighten the battery terminals.
- Wire cutters: These may be needed to trim any excess wires.
- Protective gear: This includes gloves, safety glasses, and a face shield.
Safety Precautions:
- Always disconnect the charger from the golf cart before working on the batteries.
- Wear gloves, safety glasses, and a face shield to protect yourself from acid burns and electrical shock.
- Make sure the area is well-ventilated to avoid exposure to battery fumes.
- If you’re unsure about any part of this process, it’s best to consult a professional.
Step-by-Step Guide to Connecting Golf Cart Batteries
Now, let’s get to the heart of the matter: connecting your golf cart batteries. The most common method used in golf carts is a series connection.
Series Connection
In a series connection, you link the batteries together to increase the overall voltage. Think of it like adding together building blocks to reach a greater height. Each battery adds its voltage to the total. For example, connecting six 6-volt batteries in series will give you a 36-volt system, which is standard for many golf carts.
Here’s how to connect your batteries in series:
-
Identify Positive and Negative Terminals: Each battery has a positive (+) and a negative (-) terminal. They are usually marked with red for positive and black for negative.
-
Start with the First Battery: Take a battery cable and connect one end to the positive (+) terminal of the first battery.
-
Connect to the Next Battery: Connect the other end of that cable to the negative (-) terminal of the second battery.
-
Continue the Chain: Repeat this process, connecting the positive (+) of the second battery to the negative (-) of the third, and so on, until all batteries are linked.
-
Final Connections: The positive (+) terminal of your last battery and the negative (-) terminal of your first battery will be the main terminals for your entire battery pack. These will connect to your golf cart’s electrical system.
Series connection of 6V batteries to create a 36V system:
Parallel Connection
Parallel connections are less common in golf carts but are worth understanding. In a parallel connection, you connect all the positive terminals together and all the negative terminals together. This increases the capacity (amp-hours) of your battery bank, allowing it to provide more current for a longer time, but the voltage remains the same.
Parallel connection example:
Connecting the Battery Pack to the Golf Cart
Once your batteries are connected in series or parallel, you need to connect the entire pack to your golf cart’s electrical system.
Identify the Main Cables: Your golf cart will have two main cables, one positive (usually red) and one negative (usually black).
Connect the Positive Cable: Connect the positive cable to the positive (+) terminal of the last battery in your series chain (or to the combined positive terminal in a parallel connection).
Connect the Negative Cable: Connect the negative cable to the negative (-) terminal of the first battery in your series chain (or to the combined negative terminal in a parallel connection).
Secure the Connections: Make sure all connections are tight and secure. You can use a wrench to tighten the nuts on the battery terminals.
Important Notes:
- Always refer to your golf cart’s owner’s manual for specific instructions and wiring diagrams.
- If you’re unsure about any part of the process, it’s always best to consult a qualified golf cart technician.
- Double-check all connections before powering on your golf cart to ensure everything is properly connected.
Connecting Different Battery Types
While lead-acid batteries have been the traditional choice for golf carts, lithium-ion batteries are gaining popularity due to their lighter weight, longer lifespan, and higher energy density. Let’s delve into the specific connection considerations for each type:
Lead-Acid Batteries
- Check Water Levels: Ensure that the water level in each cell of your lead-acid batteries is at the correct level. Add distilled water if needed.
- Clean Terminals: Use a wire brush or terminal cleaner to remove any corrosion or oxidation from the battery terminals.
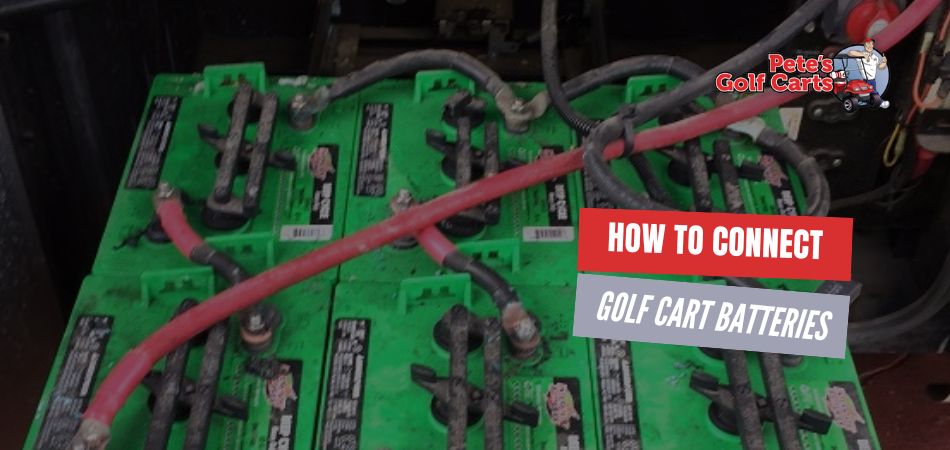
- Connect Cables: Connect the cables to the battery terminals, ensuring a tight fit. Use a wrench to tighten the terminal nuts.
- Secure Connections: Make sure the cables are securely fastened to prevent loose connections, which can lead to arcing and damage.
Lithium-Ion Batteries
- Battery Management System (BMS): Lithium-ion batteries often have a built-in BMS that manages charging and discharging. Ensure that the BMS is compatible with your golf cart’s charging system.
- Specific Connectors: Lithium-ion batteries may use different types of connectors, such as XT60 or Anderson connectors. Use the appropriate connectors and cables for your battery type.
- Balancing: Some lithium-ion batteries require balancing to ensure that all cells are at the same voltage level. Consult your battery manufacturer’s instructions for specific balancing procedures.
Proper way to connect battery terminals:
Troubleshooting Common Problems
Even with proper installation, golf cart batteries can sometimes encounter issues. Here are some common problems and how to troubleshoot them:
1. Battery Not Charging:
- Check the Charger: Ensure the charger is plugged in and functioning correctly. Check for any damaged cords or plugs.
- Inspect the Charger Connections: Verify that the charger is securely connected to both the wall outlet and the golf cart’s charging port.
- Battery Condition: Test the battery’s voltage using a multimeter. If the voltage is low, the battery may need to be replaced or recharged.
2. Low Voltage or Power Output:
- Battery Age: Older batteries may not hold a charge as well as newer ones. Consider replacing them if they are several years old.
- Battery Sulfation: Sulfation can reduce battery capacity. A battery desulfator can help restore battery performance.
- Loose Connections: Check all connections for tightness. Loose connections can cause voltage drops and poor performance.
3. Loose Connections:
- Tighten Terminals: Use a wrench to tighten all battery terminals.
- Check Cables: Inspect cables for any damage, cuts, or fraying. Replace damaged cables.
- Clean Terminals: Remove any corrosion or oxidation from the terminals using a wire brush or terminal cleaner.
4. Corrosion on Terminals:
- Clean Terminals: Use a wire brush or baking soda and water to clean the terminals.
- Apply Terminal Protector: Apply a terminal protector to prevent future corrosion.
- Replace Damaged Cables: If the cables are damaged due to corrosion, replace them.
Example of corroded battery terminals:
By addressing these common issues, you can keep your golf cart running smoothly and extend the life of your batteries. If you’re still experiencing problems, it’s recommended to consult a professional golf cart technician.
Maintaining Your Golf Cart Batteries
Proper maintenance is crucial for the longevity and performance of your golf cart batteries. Here are some tips to keep your batteries in top condition:
Regular Cleaning and Inspection:
- Clean Terminals: Regularly clean the battery terminals with a wire brush or baking soda solution to remove corrosion.
- Check Cables: Inspect the cables for any damage, wear, or loose connections.
- Visual Inspection: Visually inspect the batteries for any signs of damage, such as cracks or leaks.
Proper Charging Habits:
- Full Charge: Fully charge your batteries after each use to prevent sulfation.
- Avoid Deep Discharges: Avoid completely draining your batteries, as deep discharges can shorten their lifespan.
- Use a Quality Charger: Use a charger that is specifically designed for your battery type and voltage.
- Follow Charging Instructions: Adhere to the manufacturer’s recommended charging time and settings.
Water Levels in Lead-Acid Batteries:
- Check Water Levels: Regularly check the water levels in lead-acid batteries and add distilled water if necessary.
- Avoid Overfilling: Overfilling can lead to acid spills and damage to the battery.
- Use Distilled Water: Only use distilled water to avoid introducing impurities into the battery.
Storage Tips:
- Fully Charge: Fully charge the batteries before storing them for an extended period.
- Clean Terminals: Clean the terminals to prevent corrosion.
- Store in a Cool, Dry Place: Store the batteries in a cool, dry place away from direct sunlight.
- Periodic Charging: If storing for a long time, charge the batteries every few months to prevent sulfation.