


Keeping your golf cart engine clean is crucial for its performance and longevity. Whether you have a gas or electric model, regular cleaning will ensure it runs smoothly and efficiently. This guide provides a step-by-step approach to cleaning both types of engines, with special attention to the interior components of gas engines. While the process is generally straightforward, we’ll outline the key differences to be aware of.
Cleaning the Exterior – Electric and Gas Engines
Initial Assessment and Preparation:
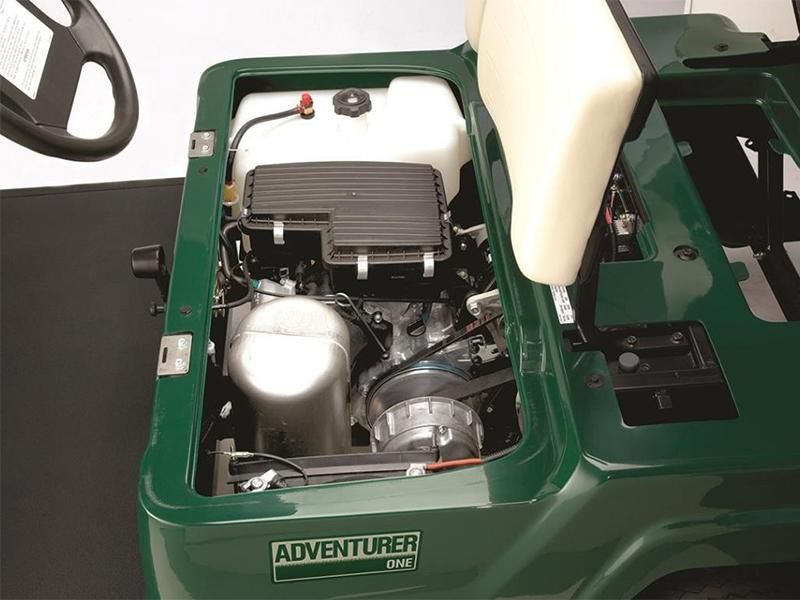
Begin by carefully opening the engine compartment. Take a moment to visually inspect the engine, noting the extent of dirt, dust, cobwebs, and any stains present. The amount of grime will vary depending on how often you clean the engine and the conditions it’s exposed to. If this is your first time cleaning the engine, expect a significant accumulation of dirt and debris.
- Focus on Wiring: Pay close attention to the wiring and electrical connections within the engine compartment. Dirt buildup on these components can interfere with the electrical current, potentially causing sparks or leading to poor engine performance.
- Loosening Debris: To begin cleaning, use a duster to gently remove loose dust from the engine surfaces. For areas with heavier dirt or cobwebs, consider using a soft brush attachment on a vacuum cleaner or a can of compressed air to dislodge the debris. If you encounter stubborn dust that adheres to surfaces, you can use a specialized dust-removing spray that attracts and lifts the particles. Remember to wipe away any excess dusting agent to prevent it from leaving a residue on the engine.
Tackling Stubborn Stains:
Beyond loose dust and debris, you’ll likely find more stubborn contaminants like dried mud, grease, or oil stains on the engine. These stains can become embedded in the engine’s surface and require more effort to remove.
- Brushing Technique: Use a soft-bristled brush to loosen and lift these stubborn stains. Gently scrub the affected areas, working in a back-and-forth motion. If necessary, you can use a small amount of water and a mild soap or degreaser to help break down the stains.
- Protecting Your Work Area: Before you start scrubbing, it’s a good idea to place a mat or drop cloth underneath the golf cart to catch any falling debris. This will prevent the dirt and grime from staining your garage floor or driveway.
- Don’t Forget the Underside: While cleaning, remember to address the underside of the engine as well. This area is often overlooked but tends to accumulate a significant amount of dirt and grime.
Thorough Washing and Drying:
Once you’ve loosened and removed the majority of the dirt and stains, it’s time to give the engine exterior a thorough wash.
Need to stock up on cleaning supplies? Click here
- Choosing the Right Soap: Use a specialized engine cleaner or a mild soap that is safe for use on engine components. Avoid harsh chemicals or abrasive cleaners that could damage the engine’s finish.
- Protecting Electrical Components: When washing, exercise caution around any exposed electrical components. To prevent electrical shock or damage, avoid spraying water directly on these areas. Instead, use a damp rag to gently wipe them clean.
- Washing Technique: Start by wetting the engine surfaces with a rag or sponge. Then, apply a small amount of soap to the rag and gently scrub the engine, paying attention to hard-to-reach areas like those under tubes and hoses. Use your fingernail or a soft brush to dislodge any remaining stubborn stains.
- Rinsing and Drying: After scrubbing, rinse the engine thoroughly with clean water to remove all traces of soap. Then, use a clean, dry rag to completely dry the engine exterior. Ensure that all surfaces are dry to prevent any potential corrosion or electrical issues.
Final Protection:
Once the engine is clean and dry, replace the engine cover to shield it from dust, debris, and other contaminants while you’re using the golf cart. This will help maintain the cleanliness of your engine and protect it from the elements.
This expanded version provides a more detailed explanation of each step while retaining clarity and organization. It aims to give the reader a comprehensive understanding of how to clean their golf cart engine effectively.
Flushing Out the Interior
If you own an electric golf cart, this section will not apply.
The following steps will guide you through this process, ensuring your engine remains clean and runs smoothly.
- Change the Oil:
- Regular oil changes are vital to the health of your gas engine. Fresh oil effectively lubricates the moving parts, minimizes friction, and helps to dissipate heat, preventing excessive wear and tear. Refer to your golf cart’s owner’s manual to determine the recommended oil type and the suggested oil change intervals.
- To begin the oil change process, ensure the golf cart is parked on a level surface and engage the parking brake. For easier access to the oil drain plug located beneath the engine, you may need to slightly elevate the cart using a jack or ramps, ensuring stability and safety throughout the process.
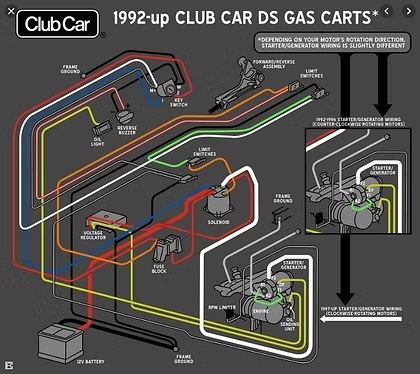
- Locate the oil drain plug, usually found on the underside of the engine. It may be helpful to consult your owner’s manual for a diagram or specific instructions for your cart model. Position an oil pan or container directly beneath the drain plug to collect the used oil.
- Carefully loosen and remove the drain plug, allowing the old oil to flow into the pan. It’s essential to exercise caution as the oil may be hot. Allow sufficient time for the oil to drain completely.
- Once the oil has finished draining, securely re-install the drain plug. Now, proceed to add new oil to the engine. Consult your owner’s manual for the correct type and quantity of oil required for your specific engine.
- Finally, dispose of the used oil in an environmentally responsible manner. Many auto parts stores and service centers accept used oil for recycling.
- Replace Lubricants:
- In addition to engine oil, various other moving parts within the engine compartment require lubrication. These may include components such as pistons, belts, and other mechanical linkages. Carefully inspect these parts for any signs of dirt, debris, or wear.
- Using a clean rag or shop towels, thoroughly wipe away any old lubricant or grime that has accumulated on these moving parts. Once clean, apply fresh lubricant according to the recommendations provided in your owner’s manual.
- Ensure that all moving parts are adequately lubricated to minimize friction and ensure smooth operation. This will help prevent premature wear and extend the lifespan of your engine.

- Add a Fuel Cleaner:
- Over time, deposits and contaminants can build up within the fuel system of your golf cart, potentially hindering engine performance. Using a fuel cleaner can help dissolve these deposits and improve the efficiency of your engine.
- Select a fuel cleaner that is compatible with your engine type. Consult your owner’s manual or a trusted mechanic for recommendations.
- Carefully pour the fuel cleaner into the gas tank, following the instructions provided on the product label.
- After adding the fuel cleaner, drive the golf cart for a while to allow the cleaner to circulate through the fuel system and effectively clean the engine.
- Clean or Replace Air and Oil Filters:
- The air and oil filters in your golf cart’s engine serve a critical function in preventing dirt, dust, and other contaminants from entering the engine and causing damage. Regularly inspect these filters to ensure they are clean and functioning correctly.
- Remove the air and oil filters from their housings. Refer to your owner’s manual for their specific locations and instructions for removal.
- Carefully inspect the filters for any signs of excessive dirt or debris. If the filters appear dirty or clogged, they may need to be cleaned or replaced. Some air filters can be cleaned with compressed air or by gently washing them with soap and water. However, if the filters are significantly dirty or damaged, it’s best to replace them with new ones.
- Consult your owner’s manual for the recommended filter types and replacement intervals.

This expanded version provides more detailed explanations and instructions while maintaining a clear and organized structure. It aims to give the reader a comprehensive understanding of how to clean and maintain the interior components of their gas golf cart engine.
Now you’re equipped to tackle that engine cleaning! With a little effort, you can keep your golf cart running like new. And remember, for all your golf cart needs – from parts and accessories to expert service – Pete’s Golf Carts is here to help. Happy golfing!