Posted on

    How to Maintain Golf Cart Batteries: 2025 Guide

    how to maintain golf cart batteries

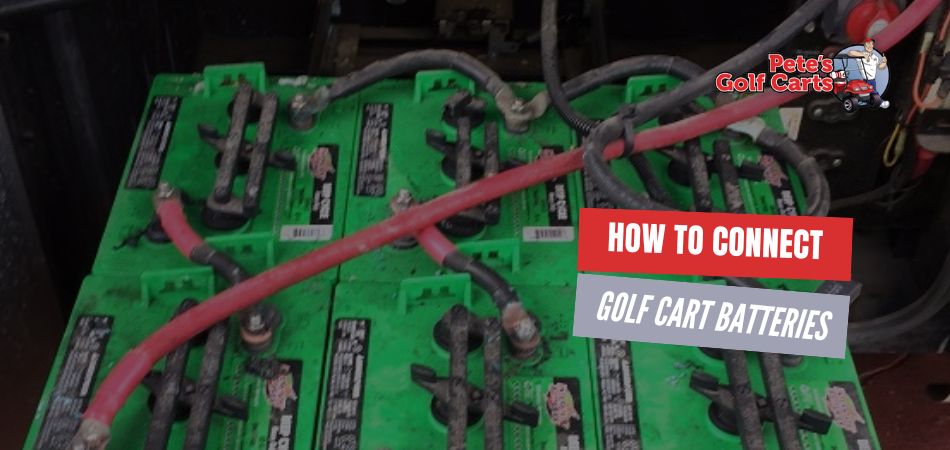
    Your golf cart batteries are the heart of your ride, powering every exhilarating trip around the course or through your neighborhood. Just like any vital organ, they need proper care to stay healthy and strong. Neglecting your batteries can lead to sluggish performance, reduced range, and ultimately, a hefty bill for replacements.

    But here’s the good news: with a little proactive maintenance, you can significantly extend the lifespan of your golf cart batteries, keep them running at peak performance, and avoid those unexpected expenses. By following some simple best practices and staying attentive to their needs, you’ll ensure your cart is always ready to roll when you are.

    This guide will walk you through everything you need to know to keep your golf cart batteries in top shape, from charging techniques and regular maintenance to long-term care and troubleshooting common problems. Let’s dive in and empower you to become a battery care pro!

    Table of Contents

    Charging Best Practices

    best practices

    Proper charging is the cornerstone of golf cart battery maintenance. Here’s how to get it right:

    Frequency

    The golden rule of golf cart battery charging is consistency. Always charge your batteries after each use, even if you’ve only driven a short distance. This might seem unnecessary, but it’s crucial for preventing sulfation, a process that can reduce battery capacity and lifespan. Think of it like refueling your car – you wouldn’t wait until it’s completely empty before heading to the gas station, would you?

    Charger Type

    Using the correct charger is essential. Lead-acid batteries (the most common type in golf carts) require a different charging profile than lithium-ion batteries. Using the wrong charger can damage your batteries and shorten their lifespan. Always consult your owner’s manual or battery specifications to ensure you’re using the appropriate charger.   

    Full Charge Cycles

    Allow your batteries to complete a full charge cycle whenever you plug them in. This means leaving them connected to the charger until it indicates that the charging process is complete. Avoid prematurely disconnecting the charger, as this can disrupt the charging cycle and lead to incomplete charging, which, over time, can negatively impact battery health.

    Overcharging

    Overcharging is a major threat to battery health. It can cause excessive heat buildup, damage the internal components, and shorten the battery’s lifespan. Most modern chargers have built-in overcharge protection, but it’s still wise to monitor the charging process and disconnect the charger once it’s complete. Avoid leaving your cart plugged in for extended periods, such as overnight or for several days.   

    Partial State of Charge (PSOC)

    Understanding the concept of PSOC is helpful for maximizing battery life. PSOC refers to the battery’s charge level when it’s not fully charged or fully discharged. Continuously operating your cart in a PSOC condition (e.g., consistently recharging at 50% capacity) can accelerate battery wear. While occasional PSOC operation is fine, aim to fully charge your batteries whenever possible to promote optimal health and longevity.

    Charging Best Practices

    golf cart battery charging

    Getting the full story from the seller is crucial. Here are some key questions to ask:

    • Usage History: Start by understanding how the cart was used. Was it primarily for leisurely rounds of golf on a well-maintained course, or was it used for off-road adventures or heavy-duty work? Knowing its history can give you insights into the wear and tear it might have experienced.
    • Maintenance Records: Ask if the seller has any maintenance records. Regular servicing is a good sign that the cart has been well-cared for. Inquire about any major repairs or replacements, such as battery changes, engine work, or brake replacements. This information can help you anticipate potential future maintenance needs.
    • Reason for Selling: It’s always a good idea to understand why the seller is parting with their cart. Are they upgrading to a newer model, or are there underlying issues they’re trying to avoid dealing with? While the answer may not be a deal-breaker, it can provide valuable context.
    • Battery Information (if electric): For electric carts, delve deeper into the battery situation. Ask about the age of the batteries, how often they were charged, and the typical charging habits of the previous owner. Inquire about any known issues with the batteries or the charging system.
    • Ownership Documents: Before making any commitments, ensure the seller has the title to the golf cart and any necessary registration paperwork. This protects you from legal complications and ensures a smooth transfer of ownership.

    Don’t hesitate to ask follow-up questions or request clarification on any points that seem unclear. A transparent and forthcoming seller is a good sign you’re dealing with someone reputable.

    Regular Maintenance

    Frequency

    The golden rule of golf cart battery charging is consistency. Always charge your batteries after each use, even if you’ve only driven a short distance. This might seem unnecessary, but it’s crucial for preventing sulfation, a process that can reduce battery capacity and lifespan. Think of it like refueling your car – you wouldn’t wait until it’s completely empty before heading to the gas station, would you?

    Charger Type

    Using the correct charger is essential. Lead-acid batteries (the most common type in golf carts) require a different charging profile than lithium-ion batteries. Using the wrong charger can damage your batteries and shorten their lifespan. Always consult your owner’s manual or battery specifications to ensure you’re using the appropriate charger.   


    Full Charge Cycles

    Allow your batteries to complete a full charge cycle whenever you plug them in. This means leaving them connected to the charger until it indicates that the charging process is complete. Avoid prematurely disconnecting the charger, as this can disrupt the charging cycle and lead to incomplete charging, which, over time, can negatively impact battery health.

    Overcharging

    Overcharging is a major threat to battery health. It can cause excessive heat buildup, damage the internal components, and shorten the battery’s lifespan. Most modern chargers have built-in overcharge protection, but it’s still wise to monitor the charging process and disconnect the charger once it’s complete. Avoid leaving your cart plugged in for extended periods, such as overnight or for several days.   

    Partial State of Charge (PSOC)

    Understanding the concept of PSOC is helpful for maximizing battery life. PSOC refers to the battery’s charge level when it’s not fully charged or fully discharged. Continuously operating your cart in a PSOC condition (e.g., consistently recharging at 50% capacity) can accelerate battery wear. While occasional PSOC operation is fine, aim to fully charge your batteries whenever possible to promote optimal health and longevity.

    Long-Term Battery Care

    While regular maintenance keeps your batteries humming, long-term care ensures they stay healthy for years to come.

    Storage

    Proper storage is crucial when you’re not using your golf cart for extended periods, such as during the off-season or while on vacation. Here’s how to do it right:   

    1. Fully Charge: Fully charge the batteries before storing them.
    2. Clean and Disconnect: Clean the batteries and disconnect them from the cart.
    3. Store in a Cool, Dry Place: Store the batteries in a cool, dry location, away from direct sunlight and extreme temperatures.   
    4. Maintain Charge: For long-term storage (over 30 days), it’s a good idea to periodically check the voltage and recharge the batteries if they fall below a certain level (consult your owner’s manual for specific recommendations).

    Temperature Considerations

    Extreme temperatures, both hot and cold, can negatively impact battery performance and lifespan. High temperatures can accelerate the degradation of battery components, while freezing temperatures can damage the internal structure of the battery. Whenever possible, store and operate your golf cart in moderate temperature conditions. If you live in an area with extreme weather, consider using a battery blanket (for cold climates) or a battery cooling fan (for hot climates) to help regulate the temperature.   

    Preventing Deep Discharge

    Deep discharge, where the battery is drained to a very low level, can severely shorten its lifespan. Avoid situations that can lead to deep discharge, such as leaving the lights on for extended periods or consistently running the battery down to its limits. If you know you won’t be using your cart for a while, top off the charge to prevent it from sitting in a discharged state.   

    Battery Lifespan and Replacement

    Even with the best care, golf cart batteries have a limited lifespan. The typical lifespan of a lead-acid battery is 3 to 5 years, while lithium-ion batteries can last 5 to 10 years or more. However, various factors, including usage patterns, charging habits, and environmental conditions, can influence their longevity.   

    Here are some signs it might be time for new batteries:

    • Decreased Run Time: If you notice a significant decrease in the distance you can travel on a single charge, it could be a sign that your batteries are nearing the end of their life.
    • Slow Charging: If the batteries take longer to charge than usual, it could indicate a problem with their capacity.
    • Physical Signs of Wear: Bulging, leaking, or cracked batteries should be replaced immediately.

    Troubleshooting Common Battery Problems

    Even with the best care, you might encounter some hiccups along the way. Here are some common battery problems and how to address them:

    Decreased Run Time

    If your cart isn’t going the distance it used to, here are some possible culprits:

    • Old Age: Batteries naturally lose capacity over time. If yours are getting up there in years, it might be time for replacements.   
    • Undercharging: Consistently undercharging can lead to sulfation, which reduces capacity. Make sure you’re fully charging your batteries after each use.   
    • Excessive Loads: Carrying heavy loads or driving up steep hills puts extra strain on the batteries, reducing their run time.
    • Corrosion: Corroded terminals can hinder current flow. Clean them regularly.    

    Slow Charging

    If your batteries are taking forever to charge, try these troubleshooting steps:

    • Check the Charger: Make sure you’re using the correct charger for your battery type and that it’s functioning properly.
    • Inspect the Connections: Ensure all connections are secure and free of corrosion.
    • Battery Age: Older batteries may take longer to charge.   
    • Temperature: Extreme temperatures can affect charging times.   

    Battery Sulfation

    Sulfation is a common issue that occurs when lead-acid batteries are left in a discharged state for extended periods. It forms lead sulfate crystals on the plates, reducing capacity and hindering performance.   

    Here’s how to prevent it:

    • Charge Regularly: Charge your batteries after each use, even if you’ve only driven a short distance.
    • Avoid Deep Discharges: Don’t let your batteries fully discharge.
    • Equalize Regularly: Equalization helps to remove sulfate crystals.   

    If you suspect sulfation is already present, a battery desulfator may be able to help restore some capacity. However, prevention is always the best strategy.

    Conclusion

    By now, you’re well-equipped to become a golf cart battery guru! Remember the essentials: charge regularly, keep those batteries clean, and show them some love with routine maintenance. A little proactive care goes a long way in extending their lifespan, maximizing performance, and saving you money in the long run.

    With happy and healthy batteries, you can confidently hit the course or cruise around the neighborhood, knowing your cart is always ready for adventure. So, go ahead and enjoy the ride!

    Posted on

    How To Connect Golf Cart Batteries ?

    how to connect your golf cart batteries

    Getting your golf cart to zip around the course reliably relies heavily on how well you connect those batteries. It’s more than just red to positive and black to negative! Different golf carts use different voltage systems (like 36V or 48V) and battery types (traditional lead-acid or modern lithium-ion).

    In this comprehensive guide, we’ll walk you through everything you need to know to connect your golf cart batteries like a pro. Whether you’re a seasoned DIYer or a complete beginner, we’ll provide clear instructions, helpful diagrams, and expert tips to get you powered up and back on the green in no time.

    Let’s get started!

    Table of Contents

    Tools and Safety Precautions

    tools

    Before you start connecting your golf cart batteries, it’s important to gather the right tools and take the necessary safety precautions. Here’s what you’ll need:

    Tools:

    • Wrench or socket wrench: This will be used to loosen and tighten the battery terminals.
    • Wire cutters: These may be needed to trim any excess wires.
    • Protective gear: This includes gloves, safety glasses, and a face shield.

    Safety Precautions:

    • Always disconnect the charger from the golf cart before working on the batteries.
    • Wear gloves, safety glasses, and a face shield to protect yourself from acid burns and electrical shock.
    • Make sure the area is well-ventilated to avoid exposure to battery fumes.
    • If you’re unsure about any part of this process, it’s best to consult a professional.

    Step-by-Step Guide to Connecting Golf Cart Batteries

    step by step

    Now, let’s get to the heart of the matter: connecting your golf cart batteries. The most common method used in golf carts is a series connection.

    Series Connection

    In a series connection, you link the batteries together to increase the overall voltage. Think of it like adding together building blocks to reach a greater height. Each battery adds its voltage to the total. For example, connecting six 6-volt batteries in series will give you a 36-volt system, which is standard for many golf carts.

    Here’s how to connect your batteries in series:


    1. Identify Positive and Negative Terminals: Each battery has a positive (+) and a negative (-) terminal. They are usually marked with red for positive and black for negative.

    2. Start with the First Battery: Take a battery cable and connect one end to the positive (+) terminal of the first battery.

    3. Connect to the Next Battery: Connect the other end of that cable to the negative (-) terminal of the second battery.

    4. Continue the Chain: Repeat this process, connecting the positive (+) of the second battery to the negative (-) of the third, and so on, until all batteries are linked.

    5. Final Connections: The positive (+) terminal of your last battery and the negative (-) terminal of your first battery will be the main terminals for your entire battery pack. These will connect to your golf cart’s electrical system.

    Series connection of 6V batteries to create a 36V system:

    Parallel Connection

    Parallel connections are less common in golf carts but are worth understanding. In a parallel connection, you connect all the positive terminals together and all the negative terminals together. This increases the capacity (amp-hours) of your battery bank, allowing it to provide more current for a longer time, but the voltage remains the same.

    Parallel connection example:

    Connecting the Battery Pack to the Golf Cart

    Once your batteries are connected in series or parallel, you need to connect the entire pack to your golf cart’s electrical system.

    1. Identify the Main Cables: Your golf cart will have two main cables, one positive (usually red) and one negative (usually black).

    2. Connect the Positive Cable: Connect the positive cable to the positive (+) terminal of the last battery in your series chain (or to the combined positive terminal in a parallel connection).

    3. Connect the Negative Cable: Connect the negative cable to the negative (-) terminal of the first battery in your series chain (or to the combined negative terminal in a parallel connection).

    4. Secure the Connections: Make sure all connections are tight and secure. You can use a wrench to tighten the nuts on the battery terminals.

    Important Notes:

    • Always refer to your golf cart’s owner’s manual for specific instructions and wiring diagrams.
    • If you’re unsure about any part of the process, it’s always best to consult a qualified golf cart technician.
    • Double-check all connections before powering on your golf cart to ensure everything is properly connected.

    Connecting Different Battery Types

    While lead-acid batteries have been the traditional choice for golf carts, lithium-ion batteries are gaining popularity due to their lighter weight, longer lifespan, and higher energy density. Let’s delve into the specific connection considerations for each type:   

    Lead-Acid Batteries

    1. Check Water Levels: Ensure that the water level in each cell of your lead-acid batteries is at the correct level. Add distilled water if needed.
    2. Clean Terminals: Use a wire brush or terminal cleaner to remove any corrosion or oxidation from the battery terminals.   
    3. Connect Cables: Connect the cables to the battery terminals, ensuring a tight fit. Use a wrench to tighten the terminal nuts.
    4. Secure Connections: Make sure the cables are securely fastened to prevent loose connections, which can lead to arcing and damage.   

    Lithium-Ion Batteries

    1. Battery Management System (BMS): Lithium-ion batteries often have a built-in BMS that manages charging and discharging. Ensure that the BMS is compatible with your golf cart’s charging system.
    2. Specific Connectors: Lithium-ion batteries may use different types of connectors, such as XT60 or Anderson connectors. Use the appropriate connectors and cables for your battery type.  
    3. Balancing: Some lithium-ion batteries require balancing to ensure that all cells are at the same voltage level. Consult your battery manufacturer’s instructions for specific balancing procedures.   

    Proper way to connect battery terminals:

    wires

    Troubleshooting Common Problems

    Even with proper installation, golf cart batteries can sometimes encounter issues. Here are some common problems and how to troubleshoot them:

    1. Battery Not Charging:

    • Check the Charger: Ensure the charger is plugged in and functioning correctly. Check for any damaged cords or plugs.
    • Inspect the Charger Connections: Verify that the charger is securely connected to both the wall outlet and the golf cart’s charging port.
    • Battery Condition: Test the battery’s voltage using a multimeter. If the voltage is low, the battery may need to be replaced or recharged.

    2. Low Voltage or Power Output:

    • Battery Age: Older batteries may not hold a charge as well as newer ones. Consider replacing them if they are several years old.
    • Battery Sulfation: Sulfation can reduce battery capacity. A battery desulfator can help restore battery performance.
    • Loose Connections: Check all connections for tightness. Loose connections can cause voltage drops and poor performance.

    3. Loose Connections:

    • Tighten Terminals: Use a wrench to tighten all battery terminals.
    • Check Cables: Inspect cables for any damage, cuts, or fraying. Replace damaged cables.
    • Clean Terminals: Remove any corrosion or oxidation from the terminals using a wire brush or terminal cleaner.

    4. Corrosion on Terminals:

    • Clean Terminals: Use a wire brush or baking soda and water to clean the terminals.
    • Apply Terminal Protector: Apply a terminal protector to prevent future corrosion.
    • Replace Damaged Cables: If the cables are damaged due to corrosion, replace them.

     Example of corroded battery terminals:

    corroded battery terminals


    By addressing these common issues, you can keep your golf cart running smoothly and extend the life of your batteries. If you’re still experiencing problems, it’s recommended to consult a professional golf cart technician.

    Maintaining Your Golf Cart Batteries

    Proper maintenance is crucial for the longevity and performance of your golf cart batteries. Here are some tips to keep your batteries in top condition:

    Regular Cleaning and Inspection:

    • Clean Terminals: Regularly clean the battery terminals with a wire brush or baking soda solution to remove corrosion.
    • Check Cables: Inspect the cables for any damage, wear, or loose connections.
    • Visual Inspection: Visually inspect the batteries for any signs of damage, such as cracks or leaks.

    Proper Charging Habits:

    • Full Charge: Fully charge your batteries after each use to prevent sulfation.
    • Avoid Deep Discharges: Avoid completely draining your batteries, as deep discharges can shorten their lifespan.
    • Use a Quality Charger: Use a charger that is specifically designed for your battery type and voltage.
    • Follow Charging Instructions: Adhere to the manufacturer’s recommended charging time and settings.

    Water Levels in Lead-Acid Batteries:

    • Check Water Levels: Regularly check the water levels in lead-acid batteries and add distilled water if necessary.
    • Avoid Overfilling: Overfilling can lead to acid spills and damage to the battery.
    • Use Distilled Water: Only use distilled water to avoid introducing impurities into the battery.

    Storage Tips:

    • Fully Charge: Fully charge the batteries before storing them for an extended period.
    • Clean Terminals: Clean the terminals to prevent corrosion.
    • Store in a Cool, Dry Place: Store the batteries in a cool, dry place away from direct sunlight.
    • Periodic Charging: If storing for a long time, charge the batteries every few months to prevent sulfation.
    Posted on

    A Step-by-Step Guide to Installing Golf Cart Body Kits

    golf cart body kit installation

    So, you’ve decided to give your golf cart a makeover. Excellent choice! A new golf cart body kit is a fantastic way to inject some personality and style into your ride, whether you’re cruising the fairways or zipping around the neighborhood.

    This guide will walk you through the process of installing a golf cart body kit, providing you with the knowledge and confidence to tackle this DIY project. Let’s get started!

    1. Choosing Your Body Kit

    Before we dive into installation, let’s talk about the different types of golf cart body kits available. The two most common materials are:

    • Fiberglass: Known for its durability and ability to take on intricate shapes. Fiberglass body kits tend to be more expensive but offer a premium look and feel.
    • ABS Plastic: A more budget-friendly option. ABS plastic is lightweight and flexible, making it easier to work with, especially for beginners.

    When selecting a body kit, consider your budget, desired style (sporty, classic, rugged, etc.), and the level of customization you’re looking for.

    2. Gathering Your Tools

    Having the right tools on hand will make the installation process smoother and more efficient. Here’s a list of essential tools:

    • Screwdrivers: A variety of sizes, both Phillips and flathead.
    • Wrenches: Metric and standard sizes to fit the bolts on your golf cart.
    • Drill: With different drill bits for pilot holes and securing screws.
    • Tape Measure: Accurate measurements are crucial for proper alignment.
    • Utility Knife: For trimming any excess material or making adjustments.
    • Pliers: For gripping and holding small parts.
    • Rubber Mallet: For gently tapping body panels into place.
    • Heat Gun (for ABS plastic kits): To help with shaping and molding the plastic.
    • Safety Glasses: Protect your eyes from debris.
    • Gloves: To protect your hands.

    3. Prepping for Installation

    • Clear the Workspace: Ensure you have ample space to work around the golf cart comfortably.
    • Disconnect the Battery: Safety first! Disconnect the battery to avoid any electrical mishaps.
    • Remove the Old Body Panels: Carefully remove the existing body panels from your golf cart. Take note of how they are attached, as this will help you with the new installation.
    • Clean the Frame: Thoroughly clean the golf cart frame to remove any dirt, rust, or debris. This will ensure a good fit for your new body kit.

    4. Installing the New Body Kit

    Now for the exciting part! Follow these steps to install your new body kit:

    • Test Fit the Panels: Before you start drilling or screwing anything in, do a dry run. Place the new body panels on the frame to check for alignment and fit.
    • Make Adjustments: If you encounter any fitment issues, use your utility knife or heat gun (for ABS plastic) to make minor adjustments.
    • Secure the Panels: Once you’re happy with the fit, start attaching the body panels to the frame. Use the provided screws or bolts, ensuring they are tightened securely but not overtightened.
    • Install Accessories: If your body kit includes headlights, taillights, or other accessories, install them according to the manufacturer’s instructions.
    • Reconnect the Battery: Once everything is in place, reconnect the battery.

    5. Finishing Touches

    • Inspect Your Work: Take a step back and admire your handiwork! Inspect the body kit for any gaps, misalignments, or loose parts.
    • Fine-Tuning: Make any final adjustments to ensure a perfect fit and finish.
    • Clean Up: Clean up any tools, debris, or leftover materials.
    • Read the Instructions: This might seem obvious, but carefully read the instructions that come with your specific body kit. They will provide valuable guidance and tips.
    • Take Your Time: Don’t rush the process. Rushing can lead to mistakes and frustration.
    • Work with a Friend: Having an extra set of hands can be incredibly helpful, especially when handling larger body panels.
    • Patience is Key: Installing a body kit can be a bit challenging at times. Be patient, take breaks when needed, and don’t be afraid to seek help if you get stuck.

    Enjoy Your New Ride!

    Congratulations! You’ve successfully installed your new golf cart body kit. Now it’s time to hit the road (or the golf course) and show off your stylish ride.

    Need More Help?

    If you have any questions or run into problems during the installation, please don’t hesitate to contact us at help@petesgolfcarts.com. We’re happy to assist!

    Posted on

    How To Clean Golf Cart Batteries ? – 2025

    How to clean golf cart batteries

    Okay, maybe not a full bath, but your golf cart batteries definitely need some TLC now and then. Did you know that neglecting your batteries can lead to a serious drop in performance? We’re talking shorter driving range, decreased power, and even a shorter overall lifespan. Yikes!

    Think of it like this: corrosion and dirt buildup on your battery terminals are like clogged arteries. They restrict the flow of electricity, making your cart work harder and ultimately wear out faster. Not to mention, a dirty battery can be a safety hazard, increasing the risk of sparks, shorts, or even fires.

    But don’t worry, we’re here to help! In this comprehensive guide, we’ll walk you through the simple steps of cleaning your golf cart batteries, whether you have traditional lead-acid batteries or the newer lithium-ion kind. We’ll cover everything from gathering the right supplies to troubleshooting common battery problems.

    So, grab your cleaning gloves and let’s get those batteries sparkling clean! ✨

    Table of Contents

    Gear Up! Essential Supplies for a Battery Cleaning Mission

    golf cart cleaning tools

    Here’s your battery cleaning checklist:

    1. Baking Soda: This household staple is a cleaning superhero! Baking soda neutralizes battery acid, making it a safe and effective way to remove corrosion. Plus, it’s readily available and inexpensive.
    2. Distilled Water: Why distilled water instead of tap water? Tap water contains minerals that can conduct electricity and potentially cause corrosion. Distilled water is purified, ensuring a safe and effective cleaning solution.
    3. Protective Gear: Safety first! Always wear gloves and eye protection when working with batteries. Battery acid can cause skin irritation and eye damage, so it’s better to be safe than sorry.
    4. Cleaning Tools: You’ll need a few tools to tackle the grime:
    5. Brushes: A stiff nylon brush is ideal for scrubbing away corrosion. An old toothbrush can also come in handy for reaching tight spots.
    6. Cloths: Microfiber cloths are great for wiping down surfaces and absorbing excess moisture.
    7. Terminal Cleaner: A dedicated battery terminal cleaner tool can help remove stubborn corrosion from the battery terminals.
    8. Wrench or Pliers: You’ll need a wrench or pliers to loosen and tighten the battery terminals. Make sure you have the correct size for your battery terminals.
    9. Petroleum Jelly or Battery Terminal Protectant: After cleaning, apply a thin layer of petroleum jelly or a specialized battery terminal protectant to the terminals. This helps prevent future corrosion and ensures good electrical contact.

    Let's Get Cleaning! A Step-by-Step Guide to Sparkling Batteries

    step by step

    Alright, cleaning supplies assembled? Safety gear on? Great! Now, let’s get down to business and give those batteries the spa treatment they deserve.

    Safety First!

    Before you even touch those batteries, remember these golden rules:

    • Power Down: Turn off your golf cart completely and remove the key. This eliminates any risk of electrical shock.
    • Disconnect: Disconnect the battery cables, starting with the negative terminal first. This is crucial to prevent accidental short circuits.
    • Ventilate: Work in a well-ventilated area, preferably outdoors. Battery cleaning can release fumes, so fresh air is your friend.
    • Protect Yourself: Wear those gloves and eye protection! Battery acid is no joke, and it’s always better to be cautious.

    Cleaning Lead-Acid Batteries

    Lead-acid batteries are the workhorses of the golf cart world, but they need a bit more attention when it comes to cleaning. Here’s the play-by-play:

    1. Visual Inspection: Before you start scrubbing, give your batteries a good once-over. Look for any cracks, leaks, or bulging in the battery case. If you spot any damage, it might be time for a new battery.
    2. Mix It Up: In a plastic container or spray bottle, mix a solution of baking soda and distilled water. A good ratio is about a quarter cup of baking soda to one liter of water. This creates a gentle yet effective cleaning agent.
    3. Scrub-a-Dub-Dub: Apply the baking soda solution to the battery case, terminals, and cables. Use a stiff nylon brush to scrub away any corrosion or dirt buildup. An old toothbrush can be helpful for those hard-to-reach areas.
    4. Rinse and Repeat: Once you’ve given everything a good scrub, rinse thoroughly with distilled water. This removes any remaining baking soda residue.
    5. Dry Time: Use a clean cloth to dry the battery completely. Make sure there’s no moisture left on the battery case or terminals.
    6. Protect and Prevent: Apply a thin layer of petroleum jelly or battery terminal protectant to the terminals. This helps prevent future corrosion and ensures a good connection.
    7. Reconnect: Reconnect the battery cables, starting with the positive terminal first this time.

    Cleaning Lithium-Ion Batteries

    Lithium-ion batteries are the newcomers to the golf cart scene, and they’re much easier to maintain. Here’s how to keep them clean:

    1. Visual Check: Inspect the battery case for any damage or debris.
    2. Wipe It Down: Use a damp cloth (not soaking wet!) to wipe down the battery case. Avoid getting any moisture inside the battery.
    3. Terminal Touch-Up: Clean the terminals with a dry brush or cloth to remove any dust or debris.
    4. Reconnect and Roll: Reconnect the battery cables and you’re good to go!

    Important Note: Always refer to your battery manufacturer’s instructions for specific cleaning recommendations.

    With these simple steps, you can keep your golf cart batteries clean, healthy, and ready to power your next adventure on the course!

    Troubleshooting Common Battery Problems

    VI. Troubleshooting Common Battery Problems

    Even with the best care, you might encounter some hiccups with your golf cart batteries. But don’t worry, we’ve got you covered! Here are some common battery problems and how to tackle them:

    • Low Battery Performance: Is your cart struggling to make it up hills or running out of juice sooner than expected? This could be due to several factors:
      • Check the Charge: Make sure your battery is fully charged. Sometimes the simplest solution is the right one!
      • Clean Those Terminals: Corrosion on the terminals can hinder current flow. Give them a good cleaning (as described earlier).
      • Inspect the Cables: Look for any damage or loose connections in the battery cables.
      • Battery Age: Batteries have a limited lifespan. If yours is getting old, it might be time for a replacement.
    • Corrosion Buildup: Those pesky white or greenish deposits on your battery terminals? That’s corrosion, and it can cause all sorts of trouble.
      • Regular Cleaning: Prevent corrosion by cleaning your batteries regularly, especially in humid or salty environments.
      • Terminal Protectant: Apply a battery terminal protectant after cleaning to help prevent future corrosion.
    • Sulfation (Lead-Acid Batteries): Sulfation occurs when lead sulfate crystals build up on the battery plates, reducing its capacity and performance.
      • Proper Charging: Avoid leaving your lead-acid batteries in a discharged state for extended periods. Keep them charged to prevent sulfation.
      • Equalization Charging: Some chargers have an equalization mode that can help reverse sulfation in its early stages.
      • Professional Help: If sulfation is severe, you might need to consult a battery professional.

    Wrapping Up

    Keeping your golf cart batteries clean is like giving your cart a regular tune-up. It improves performance, extends battery life, and enhances safety. By following the simple cleaning and maintenance tips in this guide, you can ensure your batteries stay in top shape and keep you rolling smoothly on the course.

    So, grab your cleaning supplies, put on your gloves, and give those batteries some love! Your golf cart (and your wallet) will thank you.